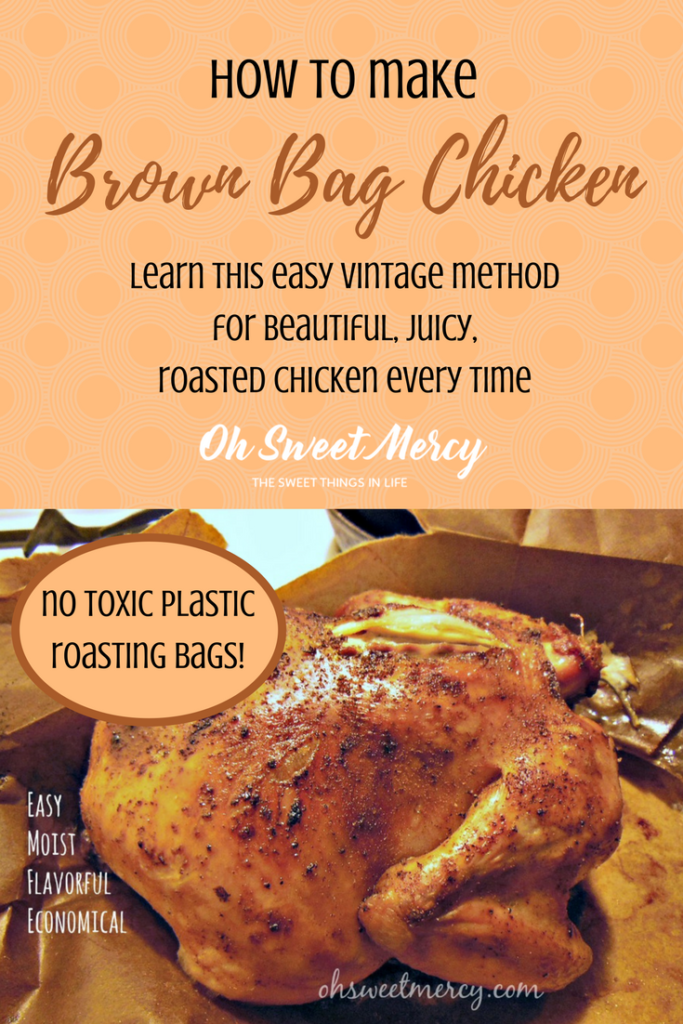
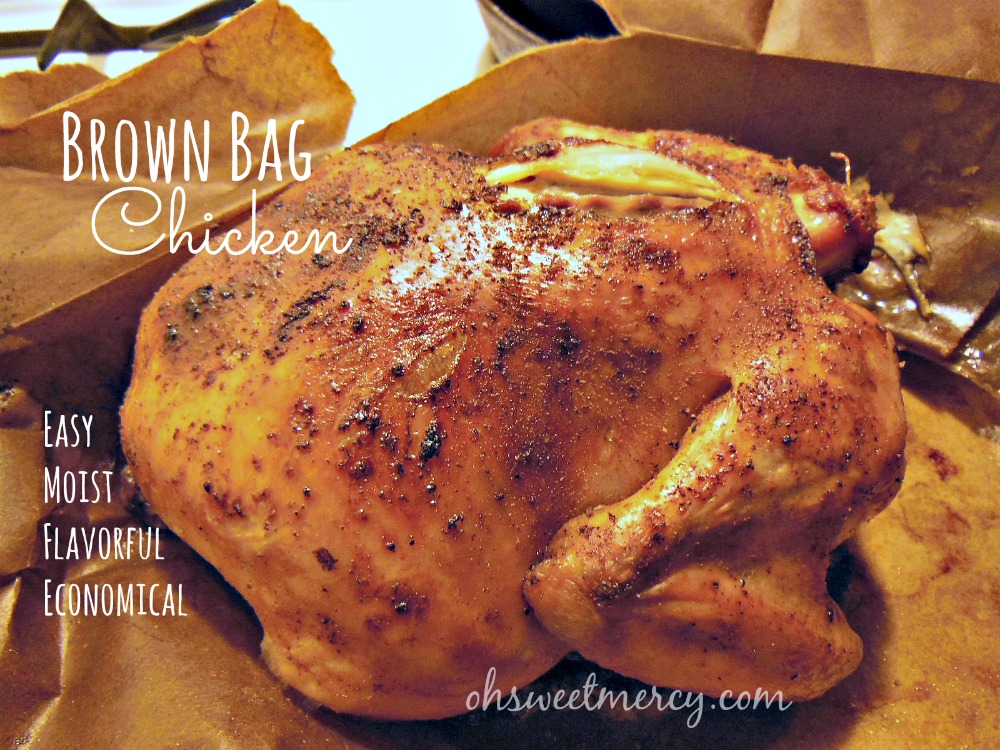
Brown bag chicken is a vintage cooking method that produces delicious, juicy chicken every time. Perfect for any poultry, too!
If you love the way a bird turns out in those plastic oven bags, but wish there was an alternative then I’m here to make that wish come true for you.
Plastics can impart unhealthy chemicals into foods, so if you’ve gone to the trouble to source local, pastured, organic poultry you don’t want to ruin it with petrochemicals right? Today, I’m sharing how I make delicious, moist, tender and flavorful Brown Bag Chicken (and even holiday Turkeys!) What? Baking in a brown paper bag? Yes, you read that right – in an ordinary brown paper bag.
Apparently, making Brown Bag Chicken has been around for several decades.
Although I could not exactly pinpoint what era in which it began, it seems like perhaps the 40s or 50s. I always feel like I should be wearing pearls, heels and one of those poofy-skirted dresses when I make this. And, depending on the day, I might feel like I got some ‘splainin to do, even though my name is not Lucy. Maybe that’s because I like to watch I Love Lucy re-runs while I’m cooking.
There are two divided camps on this method.
The Once You Cook in a Brown Paper Bag You’ll Never Go Back camp and the Cooking in a Paper Bag is DANGEROUS crowd.
The nay-sayers warn that the bag could catch on fire or that paper bags are unsanitary. It is technically possible for the bag to catch on fire, but that is probably only if it comes in contact with the side or top of the oven or the heating element in an electric model. Wouldn’t the same be true for plastic bags coming in contact with the same surfaces?
As with any method you employ to cook food inside a giant gas or electric powered box, you should pay attention to what you’re doing and use common sense.
The concern over a paper bag being unsanitary comes from the inks and glues used in manufacturing the bags, and the possibility that the paper could contain metal shavings from being recycled.
Using a bag that has no ink, or very minimal printing on the bag, that has not been used before (you can very easily and inexpensively get a new paper bag at a grocery store), minimizes at least some of those risks.
Honestly, compared to having endocrine-disrupting chemicals being steamed into your chicken, baking in a brown paper bag sounds much more healthy to me. But, that’s your call to make!
I joined the ranks of the Once You Cook in a Brown Paper Bag You’ll Never Go Back camp a couple of years ago.
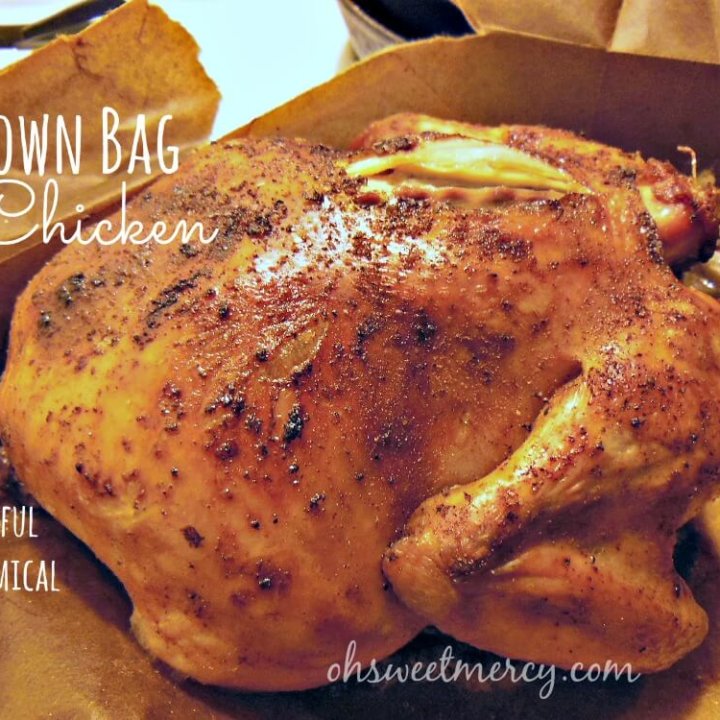
I’m not even sure how I heard about it, but I can honestly say Brown Bag Chicken is the best chicken ever – moist and flavorful! The bag keeps the moisture inside and browns and crisps the skin.
I always cook my birds breast side down, too – that keeps the breast meat from drying out. You don’t get crispy skin on the breast portion that way, but for me it’s fine since I don’t eat the skin.
It’s so easy, once you try Brown Bag Chicken I’m sure you’ll love it!
Don’t be alarmed if your kitchen smells a little funny at first (kind of like a warm, greasy brown paper bag…if you can imagine that!), that will quickly be replaced by the aroma of delectable, juicy baked chicken.
There’s also no set way to season your bird, it’s more of a technique than a recipe so you can be as minimalist or creative as you want to be.
First, you need a few things…

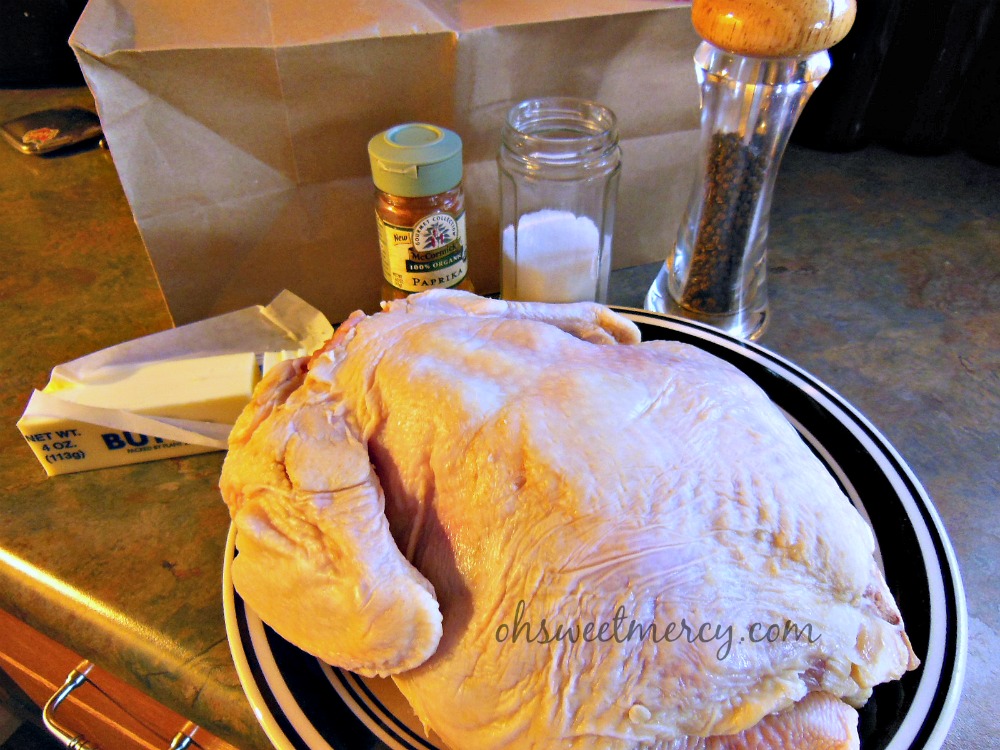
- a chicken (or any poultry that will fit in your bag)
- a plain brown paper bag (available for free or dirt cheap at your local supermarket or butcher)
- butter (or other healthy, traditional fat like coconut oil – try my favorite virgin coconut oil for a Coconut Chicken style bird!). I wouldn’t recommend olive oil due to the high heat of the oven.
- whatever seasonings you like on your chicken. my old stand-bys are: kosher salt, freshly ground black pepper and paprika.
- You can also stuff the cavity, try adding lemon slices and garlic cloves – that is amazing! Or, you could put carrots, celery, and onions in there if you’d like.
Preheat your oven to 400 before preparing your bird
Thoroughly wash your bird then pat dry.
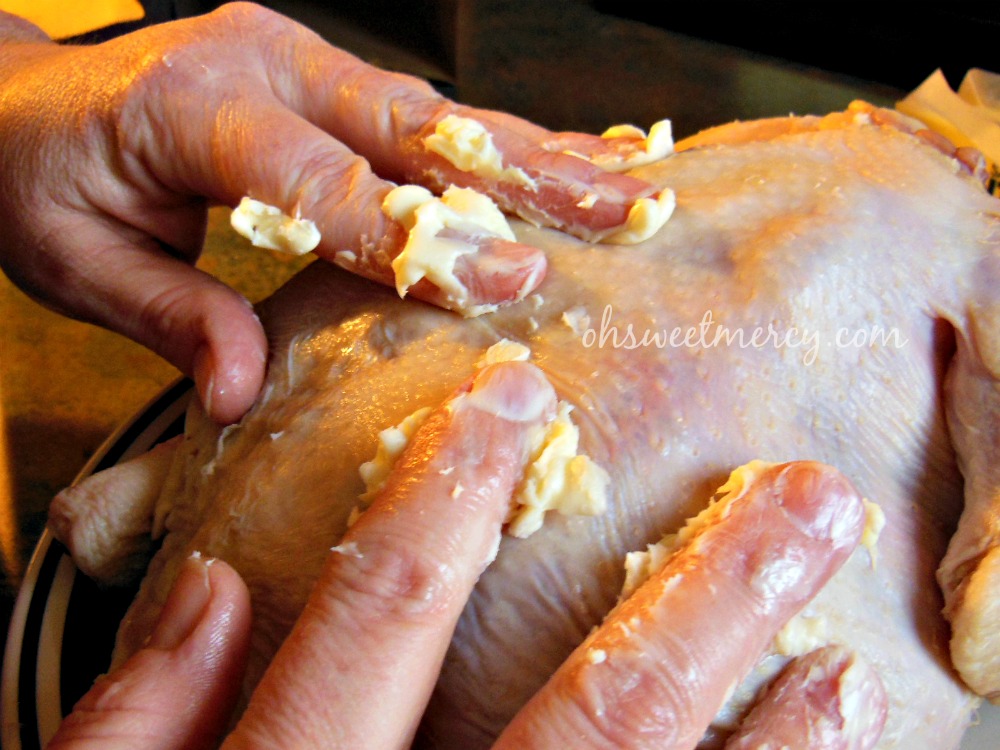
Rub butter or other healthy, traditional fat, all over the bird.
Now, I’ll be honest and tell you that rubbing butter on on a cold chicken is not as easy as you might think. See my fingers in that picture up there? Yeah, the butter just kind of collected there for the most part instead of going on the chicken. You can let your chicken skin warm up a bit first to make that easier.
Or, you could just do what I ended up doing:

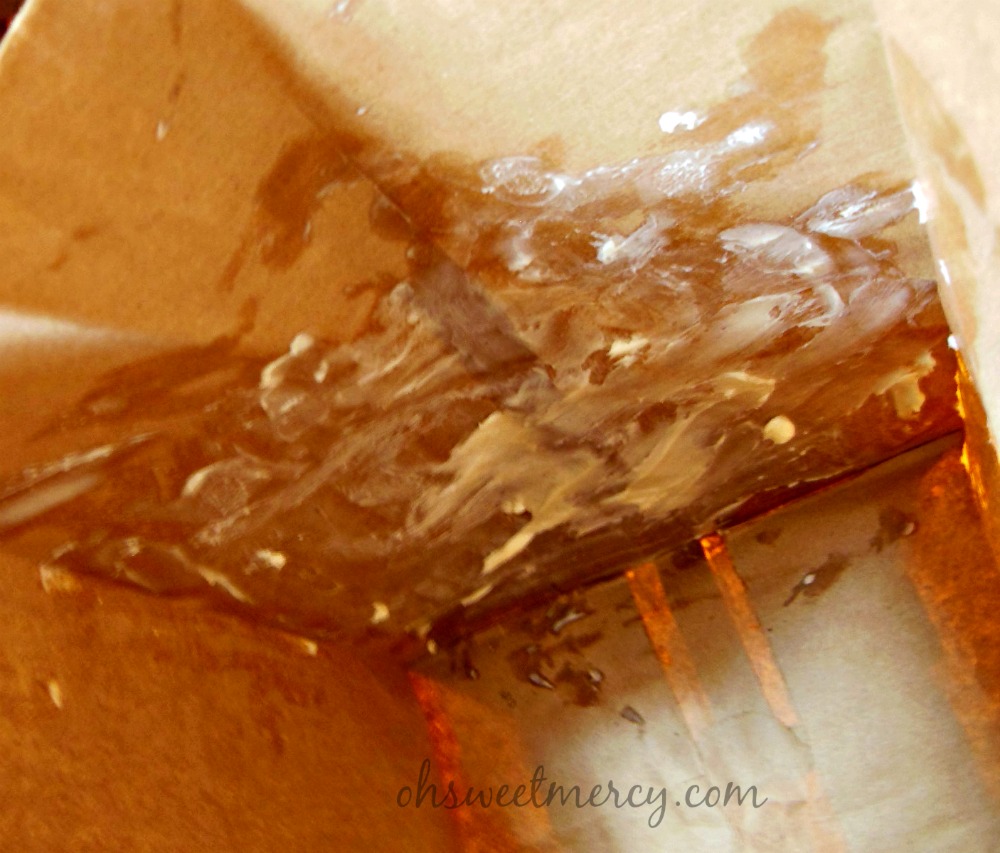
Smear that butter all over inside the bag, especially the top.
I always butter the bag anyway, just not as much. The theory is that the butter will drip off the bag and baste the chicken as it bakes. Another theory is that it seals the bag and keeps the moisture in.
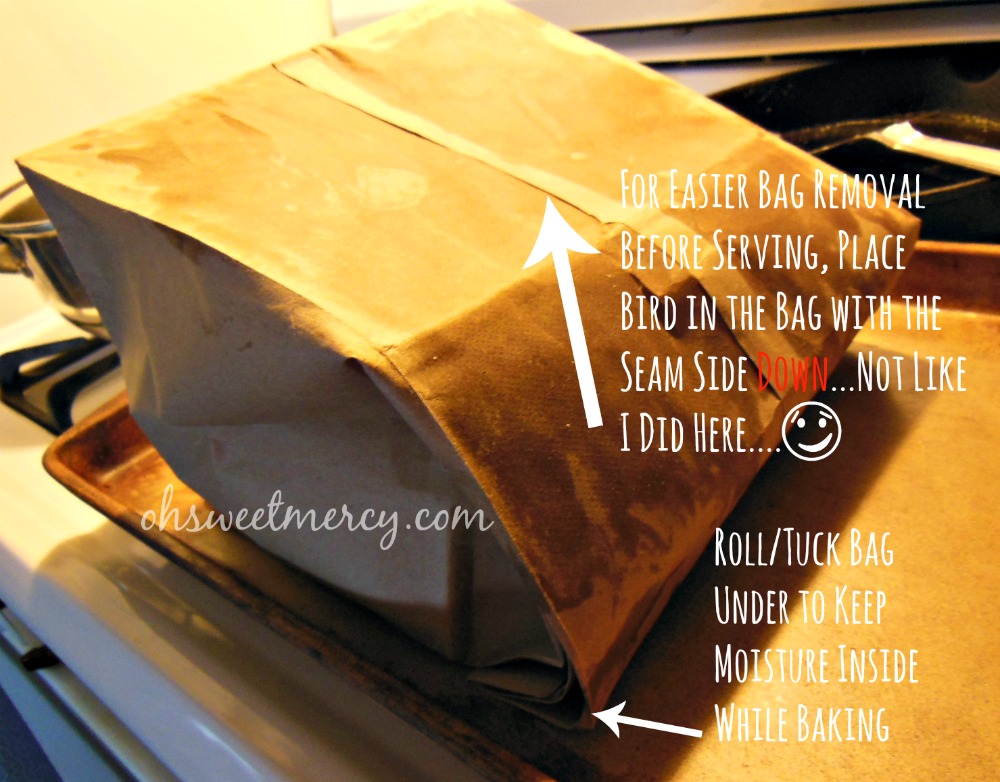
Either way, it makes awesome Brown Bag Chicken. One piece of advice: butter the side of the bag without the seam, it makes removing the bag later much easier!

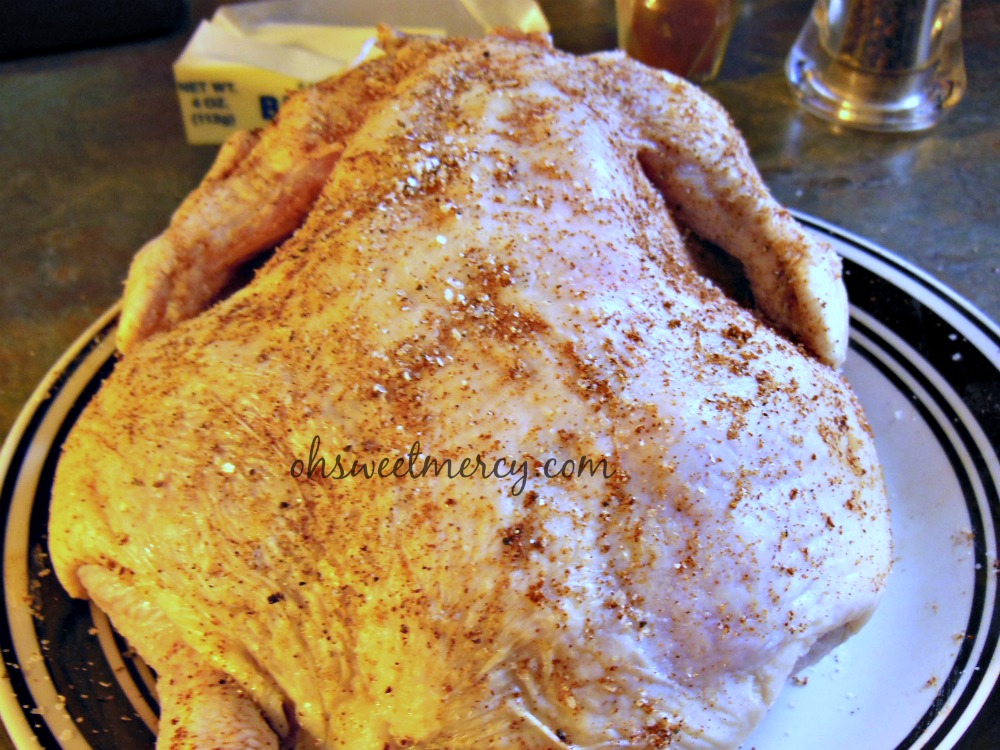
Season and stuff that bird.
If you want to stuff your bird, now is the time. Then sprinkle or rub your seasonings on the outside of the bird. I honestly just shake some stuff on there and don’t worry about measurements all that much.
If I was using a spicy kind of seasoning, I would probably be more accurate. I probably put about half a tablespoon of kosher salt, a quarter teaspoon of pepper and half a teaspoon of paprika on this one.

Bag it, seal it, bake it.
Put the chicken in the bag (SEAM SIDE DOWN!) then roll or fold the top in close to the bird, tucking it under if you can. If you can’t, and it won’t stay closed, you could put a couple staples in the fold to keep it shut. I’ve never had to do that myself. Or, you could use kitchen twine and tie it shut.
Place your buttered, seasoned, bagged bird on a baking sheet with sides. Juices will collect on the baking sheet and you don’t want that dripping to the bottom of your oven. You can also use a shallow baking dish or roasting pan. (I love my Pampered Chef Stoneware Bar Pan!).
Put it in the oven and bake for one and a half hours.
You may need to adjust your cooking times according to the size of your bird or if it’s stuffed with stuffing, for example. In my oven, an hour and a half is just right for an average sized chicken. If you remembered to put the seam side of the bag down, you can easily remove the bag by grabbing opposite corners and pulling the bag off over your chicken.
Give this brown bag chicken a rest before slicing to keep it juicy.
Waiting 10 or 15 minutes to slice gorgeously roasted bird will keep the tasty juices inside the meat. I know it’s hard to wait, but trust me it’s worth it!
Serve to your hungry and salivating dinner companions and be prepared for oooh’s and aaaahhh’s and PleaseOhPleaseMakeThisAgain’s! Serve this with Buttery Garlic, Mushroom, and Chive Spaghetti Squash or a THM friendly stuffing, such as this S style Healthy Baked Stuffing from Wonderfully Made and Dearly Loved, and a green salad or veggie for a completely healthy and tasty THM S meal!
Thanksgiving turkey turns out perfectly, too.
We’ve made many Thanksgiving turkeys using this same brown bag method. Just be sure your turkey will fit the bag you have (or vice versa).
Any time I’m roasting poultry, I use this brown bag chicken method and the results are never disappointing!
Brown Bag Chicken
Make perfectly moist, flavorful roasted whole chicken (or turkey!) every single time with this vintage cooking method.
Ingredients
- 1 whole chicken, 3-4 pounds
- 4 Tbs butter
- 1/2 Tbs kosher salt, more or less to taste
- 1/4 tsp freshly ground black pepper, more or less to taste
- 1/2 tsp paprika, more or less to taste
- 1 clean, plain (no printing or very minimal) brown paper grocery bag
Instructions
- Preheat oven to 400 degrees
- Rinse chicken and pat dry
- Rub butter all over the chicken OR
- Rub the butter on the side of the bag that will be the top when the chicken is in it
- Rub seasonings all over the chicken
- Stuff the cavity, if desired
- Place chicken in the bag, making sure the seam side is down
- Roll or fold bag closed and tuck under if you can
- Place bagged bird on a baking sheet with sides or in a shallow baking dish or roasting pan
- Place in preheated oven, MAKING SURE THE BAG DOES NOT TOUCH THE TOP OR SIDES OF THE OVEN
- Bake for one and a half hours, or until thoroughly cooked
- Remove the bag by pulling carefully on opposite corners and pulling the bag off the chicken
- Let rest for 10 or 15 minutes before slicing
Notes
Prep time includes preheating the oven. Cook time does NOT include resting time before slicing. You can season your chicken any way you like. To bake a turkey using this method, follow the same instructions BUT follow guidelines for baking whatever size turkey you have.
Recommended Products
As an Amazon Associate and member of other affiliate programs, I earn from qualifying purchases.
Nutrition Information:
Amount Per Serving: Calories: 0Cholesterol: 0mgSodium: 0mgCarbohydrates: 0gFiber: 0gSugar: 0gProtein: 0g
Like this Brown Bag Chicken recipe? Pin and share, your friends will too!
Patc says
This recipe says preheat oven to 400, cook chicken 1 hour, but
they forgot to say what temp you turn the oven down to (after)
the preheat temp is reached. It should be something lower than
400, if you are going to cook this bird for 1 hour plus.
How about 350?
dawnyoder says
That’s a great question! I do not turn it down, and in my oven it cooks perfectly in an hour and a half. It is always moist and tender. If you are not comfortable with that, I imagine you could cook it at 350. The bag keeps the moisture inside, I think that is why it doesn’t dry out.
Jo says
As you stated..this bag method goes way back. My Grandma taught passed this on to me but with the oven @ 325 cooking time 3 hours. The key is DO NOT open the bag…delicioius every time !
dawnyoder says
Hi there Jo! Thanks for stopping by and sharing that tip, I’ll be sure to try baking it at 325 for 3 hours. And yes, definitely don’t open the bag! I should add that to the post. Thanks!
Nancy says
I cooked a turkey for Thanksgiving in a paper bag when I was in college 36 years ago. Unfortunately I don’t remember the temperature or cooking time, but I do remember how fantastic it turned out. It was moist & tasty & a successful crowd pleaser! Thanks for reminding me of a great cooking method.
dawnyoder says
You’re welcome, Nancy! Thanks for stopping by and sharing your memory!